Coil Pot Unit
Artist Statement
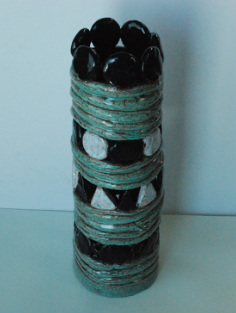
When I first heard that we were going to be making a coil pot that has the height of over 30 cm, I was shocked. I have successfully created many pinch pots, but the idea that I had to make a very large pot using a new technique was a little frightening. Even though the project seemed overwhelming, I started out by drawing some sketches in my sketchbook. I had a basic idea of making a pot that had the same width throughout the whole height. I wanted to integrate small disks and triangles in between the coils that were placed regularly from the bottom base. I stacked the coils and inserted the disks on four different levels.
When I started the project, the coils were very difficult to make. As I was trying to roll a ball of clay into a long thin line, it continuously broke into many pieces and did not have the same width throughout. Even when I made a coil and tried to put it on the pot itself, it continued to crack. For every single new coil that I put on the pot, I had to slip and score the cracked parts or take it off and put on a new coil. However, as time progressed and as my pot was about over 15 cm, I started to have fewer difficulties in making my coils and stacking them. I knew how much strength I had to put into my hand in order to keep the coils fairly even throughout the whole coil and learned to smooth my coils with a sponge to avoid cracks. In this unit, compared to the last, I learned how to control my clay in a better fashion.
I think the biggest strength of my pot is the strong/firm base. When I started making my pot, I made sure that my base was very strong. Using the slab, I made my base with the thickness of about 3 cm. Then, I used coils, instead of the disks that I was planning to use, to create a strong base. The weakness that I had as I worked on my coil pot is the glazing portion. My designs consisted of four different sectors that connect the normal coils together. However, because the disks were circular and triangular, glazing the little corners and making sure that the inside of my pot (some places) didn’t show was very difficult to do. If my design was more of uniform shape and had a less complicated structure, it would have made the glazing part easier and nicer looking. However, I still worked hard to get the little edges with a smaller brush and filled in the spaces. I succeeded in glazing all the empty spots, but am not sure whether or not the pot will turn out to look the way that I hoped. From such difficulties, I learned not to design pots that are too difficult to glaze. I learned to think ahead of the process and create pots that I can handle during both the building and the glazing stage.
